Creating Confidential Compute Capable Custom Images from Standard Windows VMs
How to create a custom image from a standard VM that can be used to provision Azure Confidential Compute VMs in Azure.
Confidential Compute and Custom Images
Creating a custom image that can be used to create Azure Confidential Compute (ACC) VMs is similar to creating a standard custom image, but with a slight twist when it comes to how the image is captured. This post covers how to create a custom image that could be used to provision a new ACC VM using either Customer Managed Key (CMK) or Platform Managed Key (PMK) encryption in any Azure region that has ACC capable AMD VM SKUs.
It is important to use the proper settings when creating the VM used to generate the custom image and capture the custom image, so that settings and features such as BitLocker are not enabled, which would require additional steps before capturing and possibly cause issues when using the captured image to provision a new CVM.
The steps outlined below require that you have access to the Azure Subscriptions containing the resources, and the current version of Azure PowerShell installed. Commands were tested using Azure PowerShell from a Powershell Core session.
Creating the VM for Custom Image Capture
From the Azure Portal, Select Virtual Machine and Create New VM
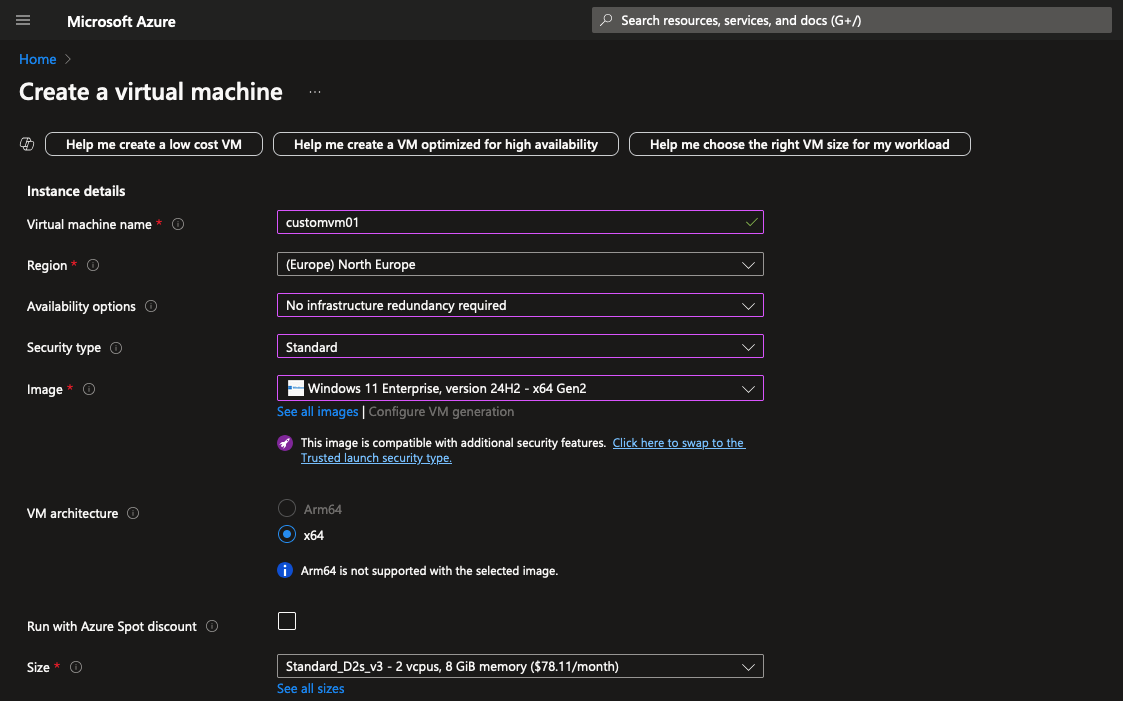
On the Instance Detail page set Security Type to Standard, and select a non-ACC VM SKU
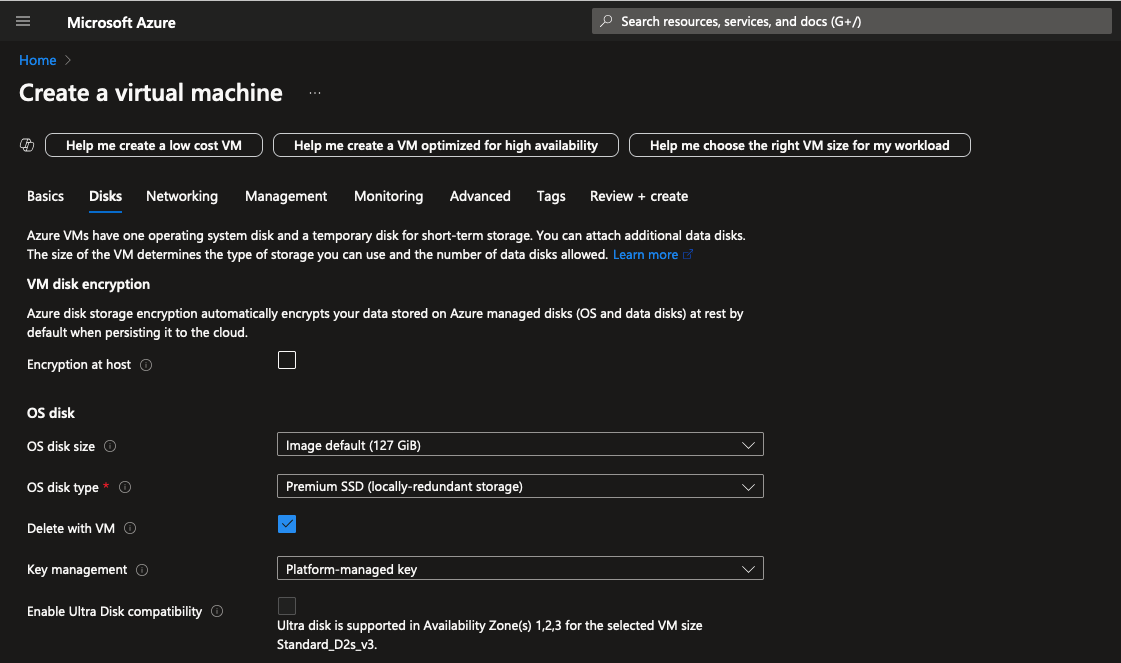
On the Disks tab, set Key Management to Platform-managed Key and leave Encryption at host unchecked
Once the Custom Image VM has been deployed, connect to the machine and perform any customization tasks required.
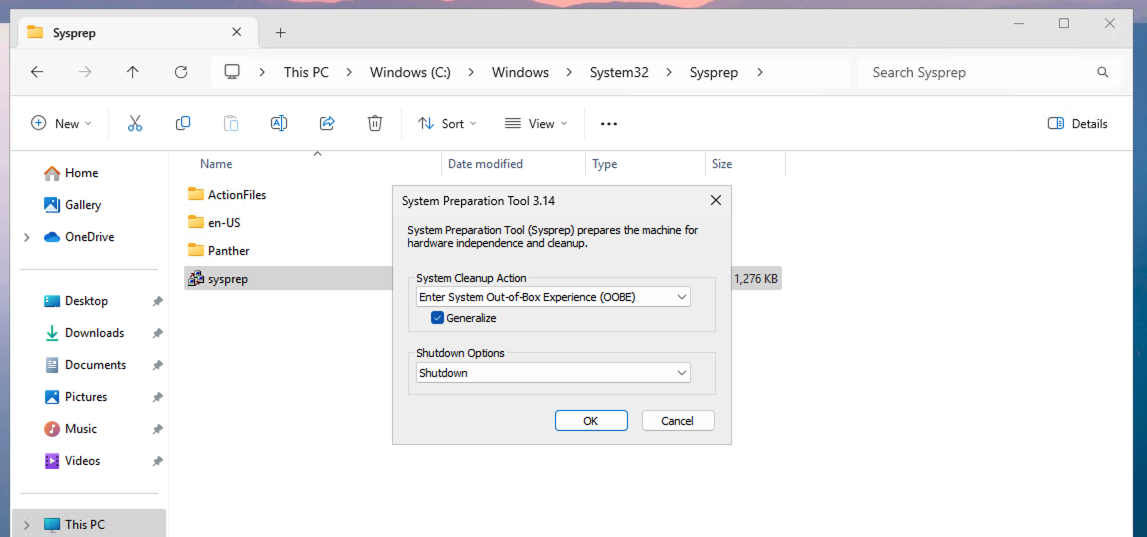
When all customizations are complete, run Sysprep with OOBE, Generalize and Shutdown selected
Once Sysprep has completed, the VM is ready to be captured
Capture the Custom Image
From an Azure PowerShell session connected to the Subscription that contains the Custom Image VM, set the proper values for the variables $vmName, $rgName, $location and $imageName.
1
2
3
4
$vmName = "customvm01"
$rgNameCustImg = "rg-custom-img-01"
$location = "North Europe"
$imageName = "image-01"
With the variables set run the following commands to create a Manged Image resource from the OS disk of the Custom Image VM.
1
2
3
4
5
6
7
8
9
10
11
12
13
14
# Verify that the VM is deallocated
Stop-AzVM -ResourceGroupName $rgNameCustImg -Name $vmName -Force

# Set the status of the VM to generalized
Set-AzVm -ResourceGroupName $rgNameCustImg -Name $vmName -Generalized

# Store the VM details in a variable
$vm = Get-AzVM -Name $vmName -ResourceGroupName $rgNameCustImg

# Create the image configuration
$imageConfig = New-AzImageConfig -Location $location -SourceVirtualMachineId $vm.Id -HyperVGeneration V2

# Create an image from the VM
New-AzImage -ImageName $imageName -ResourceGroupName $rgNameCustImg -Image $imageConfig
Importing the Custom Image into Azure Compute Gallery
Azure Portal
In the Azure Compute Gallery create a new Image Definition, with the Security Type set to Trusted launch and confidential VM supported
On the next page select the Managed Image Resource to import to the Compute Gallery for the Image Definition
Azure PowerShell
To import the Managed Image into the Compute Gallery, there first needs to be a new Image Definition created and then the Managed Image imported as a new version of the image definition.
To create the new Image Definition, set the following variables
1
2
3
4
5
6
7
8
9
10
11
12
$rgNameACG  = "rg-compute-gallery-01"
$location = "North Europe"
$galleryName = "acgallery01"
$galleryImageDefinitionName = "Def01"
$publisherName = "Publisher01"
$offerName = "Offer01"
$skuName = "Win11-24H2"
$description = "Windows 11 24H2"
# Variables to set the features of the Image Definition
$ConfidentialVMSupported = @{Name='SecurityType';Value='TrustedLaunchAndConfidentialVmSupported'}
$IsHibernateSupported = @{Name='IsHibernateSupported';Value='False'}
$features = @($ConfidentialVMSupported,$IsHibernateSupported)
With the variables set, run the following command to create the new Image Definition in the Compute Gallery
1
New-AzGalleryImageDefinition -ResourceGroupName $rgNameACG -GalleryName $galleryName -Name $galleryImageDefinitionName -Location $location -Publisher $publisherName -Offer $offerName -Sku $skuName -OsState "Generalized" -OsType "Windows" -Description $description -Feature $features -HyperVGeneration "V2"
Now that there is an Image Definition in the Compute Gallery, the Managed Image that was created from the Custom Image VM can be imported as a version of the Image Definition. To do this, first the Resource ID of the Managed Image needs to be retrieved.
1
$imageRID = (Get-AzImage -ResourceGroupName $rgNameCustImg -ImageName $imageName).Id
1
2
3
4
5
6
7
$rgNameACG = "rg-compute-gallery-01"
$location = "North Europe"
$galleryName = "acgallery01"
$galleryImageDefinitionName = "Def01"
$galleryImageVersionName = "0.0.1"
$sourceImageId = $imageRID
$storageAccountType = "Premium_LRS"
1
New-AzGalleryImageVersion -ResourceGroupName $rgNameACG -GalleryName $galleryName -GalleryImageDefinitionName $galleryImageDefinitionName -Name $galleryImageVersionName -Location $location -StorageAccountType $storageAccountType -SourceImageId $sourceImageId
Once the image has been imported and the new Definition created in the Compute Gallery, you can utilizes either the Resource ID of the new Image Definition as a parameter in a template file or create new Confidential VMs from the Compute Gallery using the Azure Portal.


