Create Confidential Compute Capable Custom Images from Windows CVMs
How to create a custom Windows image from an existing Windows CVM that can be used to provision Azure Confidential Compute VMs in Azure.
Confidential Compute Custom Images
Creating a custom image from an Azure Confidential Compute VM (CVM) requires following a different process than you would for a regular Azure VM. This is due to the design of CVMs, which utilize an OS disk and a small encrypted data disk that contains the VM Guest State(VMGS) information. As a result, using the Capture button in the Azure portal or the New-AzImage command in Azure PowerShell will not produce the desired results.
This process to create a custom image from a CVM is necessary so that the captured image is free of and VM Guest State information and the correct properties are set for the image version and reference in a Azure Compute Gallery.
The steps outlined below require that you have access to the Azure Subscriptions containing the resources, and the current version of both Azure CLI and AzCopy installed. Commands were tested using Azure CLI from a Powershell Core session.
This process to create a custom image is for an existing Windows based CVM using with Confidential OS disk encryption enabled using either PMK or CMK.
Prepare the CVM OS for Capture
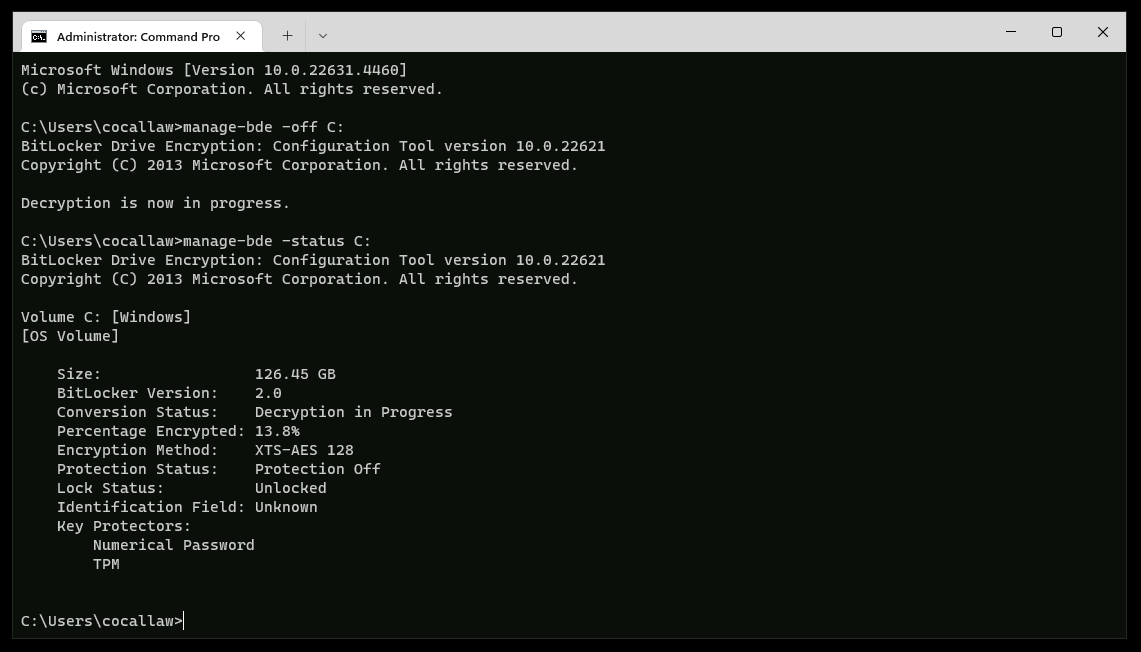
Once the customization of the Windows OS is complete, the next step is to Disable BitLocker, wait for the decryption to complete, and then run Sysprep.
To disable BitLocker and check the decryption status of the OS disk, you can use the following commands in an elevated Command Prompt.
1
2
3
4
5
# Disable BitLocker
manage-bde -off C:

# Check the decryption status
manage-bde -status C:
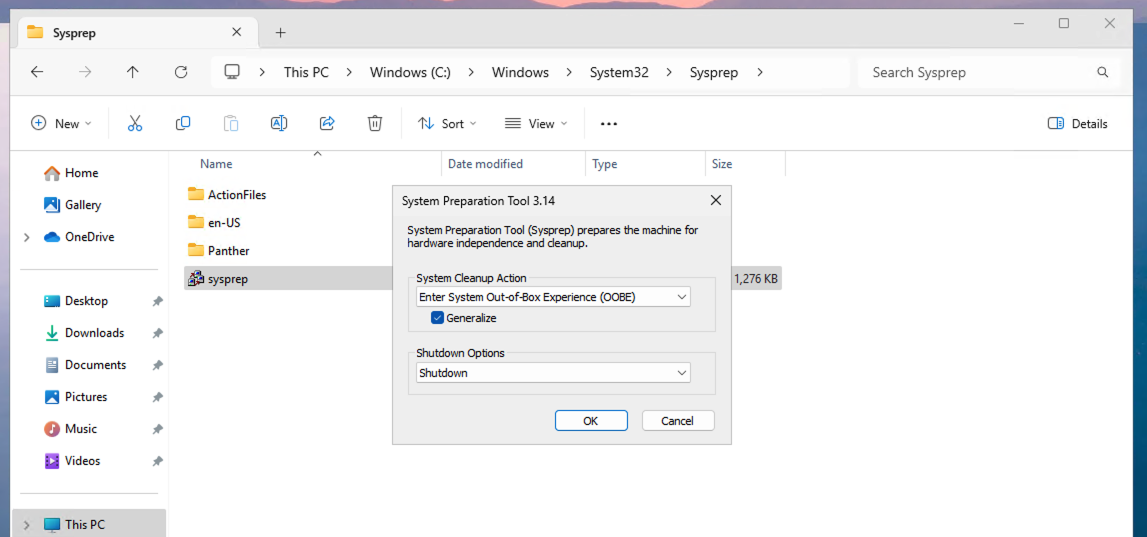
When the decryption status returns as Fully Decrypted, Sysprep can now be run. Selecting Generalize and Shutdown as the options.
Creating the Custom Image
Collect OS Disk Information
The first step is to make sure the CVM the image is being created from is fully deallocated and then collect information about the OS disk. To do so we will need to know the resource group name, VM name, and region that the CVM is located in, we will set these as variables for easy reference.
1
2
3
$region = "North Europe"
$resourceGroupName = "rg-custimg-lab-01"
$vmName = "custcvm-01"
With the variables set, verify the VM is deallocated
1
2
3
4
5
6
# Deallocate the VM
az vm deallocate --name $vmname --resource-group $resourceGroupName

# Collect the OS Disk information
$disk_name = (az vm show --name $vmname --resource-group $resourceGroupName | jq -r .storageProfile.osDisk.name)
$disk_url = (az disk grant-access --duration-in-seconds 3600 --name $disk_name --resource-group $resourceGroupName | jq -r .accessSas)
Create a Storage Account for the VHD
Next, create a storage account, this will be used to store the exported VHD of the CVMs OS disk before it is uploaded to the Compute Gallery. For this part of the process, you will need to know the name of the Storage Account and Container that will be created.
1
2
3
$storageAccountName = "stgcvmvhd01"
$storageContainerName = "cvmimages"
$referenceVHD = "${vmName}.vhd"
Create the Storage Account and Container
1
2
3
4
5
# Create Storage Account
az storage account create --resource-group ${resourceGroupName} --name ${storageAccountName} --location $region --sku "Standard_LRS"

# Create a container in the Storage Account
az storage container create --name $storageContainerName --account-name $storageAccountName --resource-group $resourceGroupName
With the Storage Account and Container created, generate a Shared Access Signature (SAS) token to upload the disk image to the container. Be sure to set the expiry date to a date in the future.
1
2
# Generate a SAS token for the container
$container_sas=(az storage container generate-sas --name $storageContainerName --account-name $storageAccountName --auth-mode key --expiry 2025-01-01 --https-only --permissions dlrw -o tsv)
Using the SAS token and information collected, the VHD can now be exported to the Storage Account using AzCopy.
1
2
3
4
5
# Build the Blob URL
$blob_url="https://${storageAccountName}.blob.core.windows.net/$storageContainerName/$referenceVHD"

# Export the VHD using AzCopy
azcopy copy "$disk_url" "${blob_url}?${container_sas}"
Upload the Image to a Compute Gallery
With the VHD successfully exported to the Storage Account, the next step is to create an image definition in the Compute Gallery and upload the VHD to the gallery as a new version. For this part of the process, you will need to know the name of the Compute Gallery, Image Definition, Offer, Publisher, SKU, and Version number that will be created.
1
2
3
4
5
6
$galleryName = "acglabneu01"
$imageDefinitionName = "cvmimage01"
$OfferName = "offername01"
$PublisherName = "pubname01"
$SkuName = "skuname01"
$galleryImageVersion = "1.0.0"
If a Compute Gallery does not already exist, create one using the following command, and create an Image Definition that has the required features and parameters set for Confidential VM support.
1
2
3
4
5
# Create the Compute Gallery
az sig create --resource-group $resourceGroupName --gallery-name $galleryName

# Create the Image Definition
az sig image-definition create --resource-group  $resourceGroupName --location $region --gallery-name $galleryName --gallery-image-definition $imageDefinitionName --publisher $PublisherName --offer $OfferName --sku $SkuName --os-type windows --os-state Generalized --hyper-v-generation V2  --features SecurityType=ConfidentialVMSupported
To upload the VHD to the Compute Gallery, the ID of the Storage Account that contains tehVHD is required when creating the image version. This can be obtained using the following command.
1
2
# Get the Storage Account ID
$storageAccountId=(az storage account show --name $storageAccountName --resource-group $resourceGroupName | jq -r .id)
With everything in place, the final step is to create the image version in the Compute Gallery using the VHD that was exported from the CVM.
1
2
# Create the Image Version
az sig image-version create --resource-group $resourceGroupName --gallery-name $galleryName --gallery-image-definition $imageDefinitionName --gallery-image-version $galleryImageVersion --os-vhd-storage-account $storageAccountId --os-vhd-uri $blob_url
The Full Image Export Process
Below is the full process to export the OS disk from the CVM, create the image, and upload it to the Compute Gallery.
1
2
3
4
5
6
7
8
9
10
11
12
13
14
15
16
17
18
19
20
21
22
23
24
25
26
27
28
29
30
31
32
33
34
35
36
37
38
39
40
41
42
43
44
45
46
47
# Set Variables
$region = "North Europe"
$resourceGroupName = "rg-custimg-lab-01"
$vmName = "custcvm-01"
$storageAccountName = "stgcvmvhd01"
$storageContainerName = "cvmimages"
$referenceVHD = "${vmName}.vhd"
$galleryName = "acglabneu01"
$imageDefinitionName = "cvmimage01"
$OfferName = "offername01"
$PublisherName = "pubname01"
$SkuName = "skuname01"
$galleryImageVersion = "1.0.0"

# Deallocate the VM
az vm deallocate --name $vmName --resource-group $resourceGroupName

# Collect the OS Disk information
$disk_name = (az vm show --name $vmName --resource-group $resourceGroupName | jq -r .storageProfile.osDisk.name)
$disk_url = (az disk grant-access --duration-in-seconds 3600 --name $disk_name --resource-group $resourceGroupName | jq -r .accessSas)

# Create Storage Account
az storage account create --resource-group ${resourceGroupName} --name ${storageAccountName} --location $region --sku "Standard_LRS"

# Create a container in the Storage Account
az storage container create --name $storageContainerName --account-name $storageAccountName --resource-group $resourceGroupName

# Generate a SAS token for the container
$container_sas=(az storage container generate-sas --name $storageContainerName --account-name $storageAccountName --auth-mode key --expiry 2025-01-01 --https-only --permissions dlrw -o tsv)

# Build the Blob URL
$blob_url="https://${storageAccountName}.blob.core.windows.net/$storageContainerName/$referenceVHD"

# Export the VHD using AzCopy
azcopy copy "$disk_url" "${blob_url}?${container_sas}"

# Create the Compute Gallery
az sig create --resource-group $resourceGroupName --gallery-name $galleryName

# Create the Image Definition
az sig image-definition create --resource-group  $resourceGroupName --location $region --gallery-name $galleryName --gallery-image-definition $imageDefinitionName --publisher $PublisherName --offer $OfferName --sku $SkuName --os-type windows --os-state Generalized --hyper-v-generation V2  --features SecurityType=ConfidentialVMSupported

# Get the Storage Account ID
$storageAccountId=(az storage account show --name $storageAccountName --resource-group $resourceGroupName | jq -r .id)

# Create the Image Version
az sig image-version create --resource-group $resourceGroupName --gallery-name $galleryName --gallery-image-definition $imageDefinitionName --gallery-image-version $galleryImageVersion --os-vhd-storage-account $storageAccountId --os-vhd-uri $blob_url

